5 Creative Nail Polish Designs That Non-Artists Can Make On Their Own
My name is Brittany, and I'm not an artist.
Though you could say I've dabbled in "the arts," I have never quite been able to put pen to paper and come out with a visual masterpiece.
But that doesn't mean I haven't fooled people.
With the invention of photo-sharing sites and "the mani cam," nail art has become increasingly popular, and I'd hate to miss out on this trend just because I can't seem to tap into my inner Picasso.
Nail art can seem impossible for the non-artist, but I have devised a few designs that are practically impossible to mess up, even if your nerves make your hands shake.
All you need is a black nail art pen and a few shades of your favorite polish.
The key to all nail art success is letting each step dry fully before moving on to the next. This includes base coats and nail pen designs.
Here are five nail art designs all non-artists can DIY this summer:
1. Lana del Rey-inspired triangle tips
Skill level required: You are able to draw the letter "A" in thick marker.
How to:
1. File nails into a defined square shape. 2. Paint all nails with a clear, high shine base or top coat. 3. Grab red color and fully coat brush with color, making sure polish is not beading off the brush. 4. Place brush on far left side of fingernail, about 1/3 away from top of nail. 5. Make a diagonal stroke upward, filling in any space lacking color. 6. Repeat on opposite side, let dry and seal with top coat.
2. Insta-worthy dots
Skill level required: You can fill in an elementary school Scantron bubbler.
How to:
1. Apply base coat, let dry. 2. Apply your favorite color to all nails. A teal or baby pink color works well for this look. Let dry. 3. With nail art pen, make small, circular dot in the middle of nail toward bottom of nail bed. 4. Let dry, seal with top coat.
3. Flirty eye winks
Skill level required: You can seamlessly write your name in sand for your summer Facebook cover photo.
How to:
1. Apply base coat, let dry. 2. Apply your favorite color to all nails, let dry. 3. With nail art pen, draw an "eyelid." The key is to draw wide half-ovals, rather than half circles. 4. Add lashes to the lids by creating thin lines going outward. Make sure there is a good amount of space between each lash; multiple lines close together looks messy. 5. Seal with top coat.
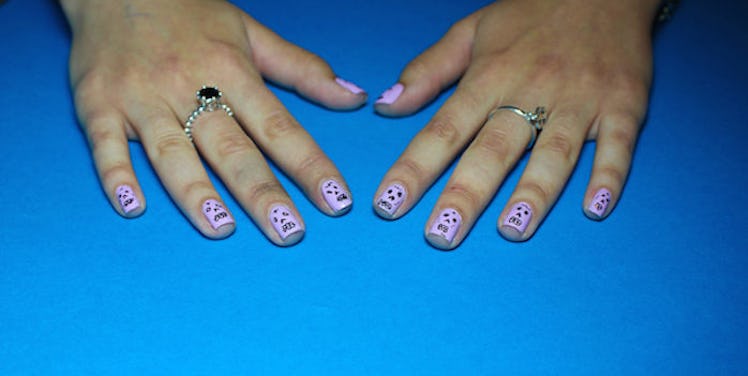
4. Sugar skulls
Skill level required: You can stay focused long enough to read an Elite Daily article.
How to:
1. Apply base coat, let dry. 2. Apply your favorite color to all nails, let dry. 3. Start by making two thick, black dots for eyes close to the nail bed. 4. Draw an upside down "V" for the nose, under the eyes. 5. Draw a single horizontal line under nose for the mouth. 6. Make little half circles above the horizontal line and below it, connecting each half circle. 7. Make each nail look different by adding crosses, brows or thin dots to the top of eyes or side of skull face. 8. Add a pop of color to the eyes by dotting a different color over the black. 9. Seal with top coat.
5. Slime
This one takes a little bit of a steady hand, but if you practice a bit with a pen and paper before starting, you'll get it down. It's a lot easier than it looks at first, which means people will be all the more impressed with your non-artist skills.
Skill level required: You can follow along in one of those painting and BYOB workshops.
How to:
1. Apply base coat, let dry. 2. Apply your favorite color to all nails, let dry. 3. Start by outlining dripping, tear-drop shapes starting from the top of your nail going toward the nail bed. 4. Make drips as long or as short as you want, alternating between each one. 5. Fill in the shape with the pen to create solid black drip effect. 6. Seal with top coat.