This Easy DIY Embroidery Trick Will Make Your Cheap Denim Look Super Expensive
I've said it before and I'll say it again: I like shopping on a budget, but I also love expensive-looking things. Luckily, there's a way to have both — and all it takes is a needle and some colorful thread. Here's how to embroider jeans on the cheap and make your budget-friendly frocks look super expensive.
I've been meaning to do this for a long time. I graduated with a major in fashion design, so there are tons of skills I learned (and paid a lot of money for) that I've stopped practicing. I once embroidered a print on an entire skirt and matching crop top for a class I aced. After that class, I set a goal to embroider a majority of the pieces in my closet to make them feel cooler and more special. That was seven years ago, and I'm finally getting around to it, but you know what they say: It's better late than never.
No matter what the garment is (a pair of jeans, a denim jacket, a gingham dress), if it's monogrammed with your initials, Instagram handle, or your favorite quote, it instantly feels more expensive. But taking your best closet staples to a shop for a custom design could actually cost you a pretty penny. You know what is much cheaper? A needle and some embroidery thread. And the best part is, stitching your name on a pair of jeans is actually super easy.
What you need:
- Embroidery thread comes in every color, so no matter what's in your closet, you can find a hue that matches. You can even buy a pack of 100 different colors for $12 on Amazon if you like options.
- Scissors
- Needle
- Pencil, pen, or chalk for mapping out your design.
Step 1: Pick Your Placement
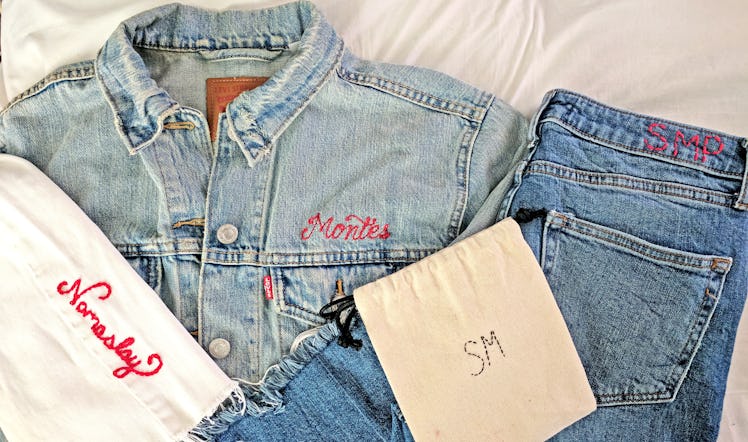
Popular placements for jeans include along the waistband, down the side seams, on pockets, and along the hemline. Or you could do a T-shirt over a pocket or along the neckline, and a denim jacket under the collar or on the chest. Scroll for some inspiration.
Step 2: Pick Your Stitch
You have two to choose from: a chain or a straight stitch. A chain stitch is a series of looped stitches that creates a chain-like effect (click here for a video tutorial), while a straight stitch involves an in-out motion that creates single dash-like stitches (check it out here.)
Step 3: Pencil In Your Design
You can print your design on water soluable paper and stitch right onto that, or you can just wing it with by drawing directly onto your clothes. Lightly drawing in pencil or pen will be covered by your embroidery or come off in the wash anyway.
I wrote "Namaslay" in pencil along the side seam of some old white jeans I had hanging in my closet.
Step 4: Embroider Away
Now that you've chosen your thread color, placement and stitch type, thread your needle, tie a knot at the end of your thread and get to stitching.
I chose the chain stitch for my jeans. This one takes a bit longer than the straight stitch, but it's totally worth it.
Throw on some Netflix, get comfy on the couch, and DIY your way to a more expensive-looking wardrobe.
My "Namaslay" chain stitch project took me a total of an hour and a half to finish. Not bad!
And voilá! Just like that, a pair of custom jeans. To be totally honest, I'm not sure that I love the word I chose, but I couldn't think of anything else to stamp on my white jeans. But the good news is, if it's not what you expected, you can carefully cut out the thread and your jeans are back to normal. If you decide you want something else, you can just try it again.
After my first try, I decided to straight-stitch my initials on the waistband of another pair of jeans.
The P is for my husbands last name and now that I think about it, I could've used this more when I was getting married. Imagine a white stitch that says "Just Married" on my honemoon luggage or "Mrs. Pena" on a bathing suit. I should've even embroidered my bridesmaid's names on everything for them. Sorry, ladies!
Anyways, the possibilities are endless. Now, gather your supplies and stitch your little heart right onto your butt.